

基于rhel7.2的Zabbix平台搭建和部署(一)
基于rhel7.2的zabbix平台搭建和部署(一)
一、实验环境:
(1)虚拟机:rhel7.2 x86_64
(2)数据库:mysql5.7.13
(3)nginx1.10.2
(4)PHP5.6.27
(5)zabbix3.2.3
二、安装编译工具及库文件
[root@localhost ~]# yum-y install make apr* autoconf automake curl-devel gcc gcc-c++ openssl openssl-devel gd kernel keyutils patch perl kernel-headers compat* mpfr cpp glibc libgomp libstdc++-devel keyutils-libs-devel libcom_err-devel libsepol-devel libselinux-devel krb5-devel zlib-devel libXpm* freetype libjpeg* libpng* libtool* libxml2 libxml2-devel patch libcurl-devel bzip2-devel freetype-devel
三、安装mysql5.7.13
(1)安装具体步骤,请参考我的博文:http://wutengfei.blog.51cto.com/10942117/1931482
(2)mysql安装完毕后,看一下mysql的服务
[root@localhost ~]# ps -ef |grep mysql

[root@localhost ~]# netstat -lnp |grep mysql

(3)防火墙开启3306端口例外
[root@localhost ~]# firewall-cmd --permanent --add-port=3306/tcp
success
[root@localhost ~]# firewall-cmd --reload
success

(4)数据库密码:123456
四、安装nginx1.10.2
(1)解压zlib和pcre
[root@localhost src]# tar -zxvf zlib-1.2.8.tar.gz
[root@localhost src]# tar -zxvf pcre-8.39.tar.gz
说明:不需要编译,只需要解压就行。
(2)创建组账户和用户账户
[root@localhost ~]# groupadd www
[root@localhost ~]# useradd -g www -s /sbin/nologin www
[root@localhost ~]# grep www /etc/passwd
www:x:1000:1000::/home/www:/sbin/nologin
(3)下载安装nginx
[root@localhost src]# tar -zxvf nginx-1.10.3.tar.gz
[root@localhost src]# cd nginx-1.10.3
[root@localhost nginx-1.10.3]# ./configure --prefix=/usr/local/nginx1.10 --with-http_dav_module --with-http_stub_status_module --with-http_addition_module --with-http_sub_module --with-http_flv_module --with-http_mp4_module --with-pcre=/usr/src/pcre-8.39 --with-zlib=/usr/src/zlib-1.2.8 --with-http_ssl_module --with-http_gzip_static_module --user=www --group=www && make && make install
(4)做软链接
[root@localhost nginx-1.10.3]# ln -s /usr/local/nginx1.10/sbin/nginx /usr/local/sbin/
(5)nginx语法检查
[root@localhost nginx-1.10.3]# nginx -t

(6)启动nginx并查看服务
[root@localhost nginx-1.10.3]# netstat -lnp |grep nginx

(7)防火墙开启80端口例外
[root@localhost ~]# firewall-cmd --permanent --add-port=80/tcp
success
[root@localhost ~]# firewall-cmd --reload
success

(8)在一台客户端访问测试

五、安装php5.6.27
(1)安装libmcrypt
[root@localhost src]# tar -zxvf libmcrypt-2.5.7.tar.gz
[root@localhost src]# cd libmcrypt-2.5.7
[root@localhost libmcrypt-2.5.7]# ./configure && make && make install
(2)做软链接
[root@localhost ~]# ln -s /usr/local/mysql/lib/libmysqlclient.so.20.3.0 /usr/local/mysql/lib/libmysqlclient_r.so
(3)安装php
[root@localhost src]# tar -zxvf php-5.6.27.tar.gz
[root@localhost src]# cd php-5.6.27
[root@localhost php-5.6.27]# ./configure --prefix=/usr/local/php5.6 --with-config-file-path=/etc --with-mysql=/usr/local/mysql --with-mysqli=/usr/local/mysql/bin/mysql_config --with-mysql-sock=/usr/local/mysql/mysql.sock --with-gd --with-iconv --with-libxml-dir=/usr --with-mhash --with-mcrypt --with-config-file-scan-dir=/etc/php.d --with-bz2 --with-zlib --with-freetype-dir --with-png-dir --with-jpeg-dir --enable-xml --enable-bcmath --enable-shmop --enable-sysvsem --enable-inline-optimization --enable-mbregex --enable-fpm --enable-mbstring --enable-ftp --enable-gd-native-ttf --with-openssl --enable-pcntl --enable-sockets --with-xmlrpc --enable-zip --enable-soap --without-pear --with-gettext --enable-session --with-mcrypt--with-curl && make && make install
(4)拷贝样例配置文件并修改
[root@ php-5.6.27]# cp php.ini-production /etc/php.ini
[root@ php-5.6.27]# vim /etc/php.ini
在/etc/php.ini配置文件中修改如下内容:
 //设置时区
 //禁止显示php版本的信息
 //支持php短标签
 //上传文件大小
 //php脚本最大执行时间

//以秒为单位对通过POST、GET以及PUT方式接收数据时间进行限制


(5)创建php-fpm服务启动脚本
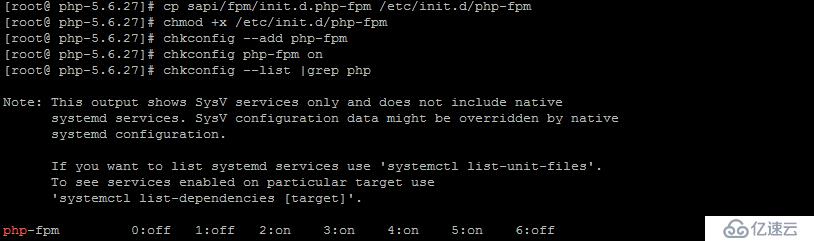
[root@ php-5.6.27]# cp sapi/fpm/init.d.php-fpm /etc/init.d/php-fpm
[root@ php-5.6.27]# chmod +x /etc/init.d/php-fpm
[root@ php-5.6.27]# chkconfig --add php-fpm
[root@ php-5.6.27]# chkconfig php-fpm on
[root@ php-5.6.27]# chkconfig --list |grep php
Note: This output shows SysV services only and does not include native
systemd services. SysV configuration data might be overridden by native
systemd configuration.
If you want to list systemd services use 'systemctl list-unit-files'.
To see services enabled on particular target use
'systemctl list-dependencies [target]'.
php-fpm 0:off 1:off 2:on 3:on 4:on 5:on 6:off
(6)提供php-fpm配置文件并编辑
[root@ php-5.6.27]# cp /usr/local/php5.6/etc/php-fpm.conf.default /usr/local/php5.6/etc/php-fpm.conf
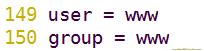
[root@ php-5.6.27]# vim /usr/local/php5.6/etc/php-fpm.conf
在配置文件中修改如下内容:






(7)启动php-fpm服务并查看
[root@ ~]# service php-fpm start
Starting php-fpm done
[root@ ~]# netstat -lnp |grep php-fpm
tcp 0 0 127.0.0.1:9000 0.0.0.0:* LISTEN 3203/php-fpm: maste

六、配置nginx支持php
[root@ ~]# vim /usr/local/nginx1.10/conf/nginx.conf
user www www;
worker_processes 4;
#error_log logs/error.log;
#error_log logs/error.log notice;
#error_log logs/error.log info;
#pid logs/nginx.pid;
events {
worker_connections 1024;
}
http {
include mime.types;
default_type application/octet-stream;
#log_format main '$remote_addr - $remote_user [$time_local] "$request" '
# '$status $body_bytes_sent "$http_referer" '
# '"$http_user_agent" "$http_x_forwarded_for"';
#access_log logs/access.log main;
sendfile on;
#tcp_nopush on;
#keepalive_timeout 0;
keepalive_timeout 65;
#gzip on;
server {
listen 80;
server_name localhost;
charset utf-8;
#access_log logs/host.access.log main;
location / {
root html;
index index.php index.html index.htm;
}
#error_page 404 /404.html;
# redirect server error pages to the static page /50x.html
#
error_page 500 502 503 504 /50x.html;
error_page 500 502 503 504 /50x.html;
location = /50x.html {
root html;
}
location /ststus {
stub_status on;
}
# proxy the PHP scripts to Apache listening on 127.0.0.1:80
#
#location ~ \.php$ {
# proxy_pass http://127.0.0.1;
#}
# pass the PHP scripts to FastCGI server listening on 127.0.0.1:9000
#
location ~ \.php$ {
root html;
fastcgi_pass 127.0.0.1:9000;
fastcgi_index index.php;
# fastcgi_param SCRIPT_FILENAME /scripts$fastcgi_script_name;
include fastcgi.conf;
}
# deny access to .htaccess files, if Apache's document root
# concurs with nginx's one
#
#location ~ /\.ht {
# deny all;
#}
}
# another virtual host using mix of IP-, name-, and port-based configuration
#
#server {
# listen 8000;
# listen somename:8080;
# server_name somename alias another.alias;
# location / {
# root html;
# index index.html index.htm;
# }
#}
# HTTPS server
#
#server {
# listen 443 ssl;
# server_name localhost;
# ssl_certificate cert.pem;
# ssl_certificate_key cert.key;
# ssl_session_cache shared:SSL:1m;
# ssl_session_timeout 5m;
# ssl_ciphers HIGH:!aNULL:!MD5;
# ssl_prefer_server_ciphers on;
# location / {
# root html;
# index index.html index.htm;
# }
#}
}
[root@ ~]# nginx -t
nginx: the configuration file /usr/local/nginx1.10/conf/nginx.conf syntax is ok
nginx: configuration file /usr/local/nginx1.10/conf/nginx.conf test is successful

[root@ ~]# nginx
[root@ ~]# netstat -lnp |grep nginx
tcp 0 0 0.0.0.0:80 0.0.0.0:* LISTEN 3302/nginx: master

七、测试LNMP
(1)进入nginx默认的网页根目录,创建test.php的测试页:
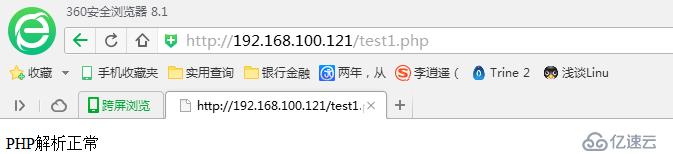
[root@ ~]# vim /usr/local/nginx1.10/html/test1.php
echo "PHP解析正常";
?>
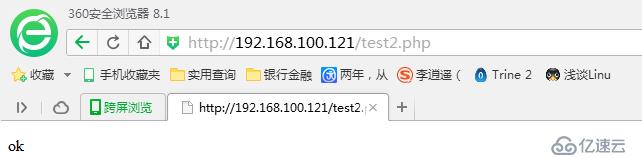
[root@ ~]# vim /usr/local/nginx1.10/html/test2.php
$link=mysql_connect('localhost','root','123456');
if($link) echo "ok";
mysql_close();
?>
(2)在客户端上测试
有两种方法:
方法一:使用curl命令
[root@ ~]# curl localhost/test1.php
PHP解析正常
[root@ ~]# curl localhost/test2.php
ok
方法二:使用浏览器
以上就是LNMP部署过程!
上一篇:决定网站访问速度快慢的因素总结
下一篇:如何理解find命令